Receive Your First Webhook
Now that your account and destination are configured, let's send your first webhook through Relae!
Overview
In this guide, you'll:
- Configure your vendor to send webhooks to Relae
- Trigger a test webhook event
- View the event in your Relae dashboard
- Verify the webhook was forwarded to your application
- Validate the HMAC signature (recommended)
Step 1: Configure Your Vendor
You need to tell your vendor (Stripe, Shopify, GitHub, etc.) to send webhooks to your Relae endpoint URL instead of directly to your application.
General Steps (All Vendors)
- Log in to your vendor's dashboard
- Navigate to webhook or API settings
- Create a new webhook endpoint
- Paste your Relae endpoint URL:
https://api.relaehook.com/webhook/{your-unique-id} - Select the events you want to receive
- Save the webhook configuration
Vendor-Specific Guides
Stripe
- Go to Stripe Dashboard
- Navigate to Developers → Webhooks
- Click "Add endpoint"
- Enter your Relae URL:
https://api.relaehook.com/webhook/{your-id} - Select events to listen to (e.g.,
payment_intent.succeeded) - Click "Add endpoint"
- Copy the Signing secret (starts with
whsec_) - Go back to Relae → Destinations → Edit your Stripe destination
- Paste the signing secret in "Vendor Webhook Secret"
- Save
Shopify
- Go to your Shopify Admin
- Navigate to Settings → Notifications
- Scroll to Webhooks section
- Click "Create webhook"
- Select an event (e.g.,
Order creation) - Set Format to JSON
- Enter your Relae URL:
https://api.relaehook.com/webhook/{your-id} - Click "Save webhook"
- Note: Shopify doesn't show the signing secret directly - it's in the
X-Shopify-Hmac-Sha256header
GitHub
- Go to your GitHub repository
- Navigate to Settings → Webhooks
- Click "Add webhook"
- Payload URL:
https://api.relaehook.com/webhook/{your-id} - Content type:
application/json - Secret: Enter a random string (you'll add this to Relae)
- Select events to trigger webhook
- Click "Add webhook"
- Copy the secret you entered
- Add it to your Relae destination as "Vendor Webhook Secret"
Step 2: Trigger a Test Event
Most vendors let you send a test webhook. Here's how:
Stripe
- In the Webhooks dashboard
- Click on your webhook endpoint
- Click "Send test webhook"
- Select an event type
- Click "Send test webhook"
Shopify
- Create a test order in your development store
- Or use Shopify's "Test notification" button
GitHub
- Go to your webhook settings
- Click "Edit"
- Scroll down and click "Redeliver" on a past event
- Or push a commit to trigger a
pushevent
You can also test with cURL:
curl -X POST https://api.relaehook.com/webhook/{your-id} \
  -H "Content-Type: application/json" \
  -d '{"event": "test", "message": "Hello from manual test"}'
Step 3: View the Event in Relae
- Go to your Relae dashboard
- Click the "Webhooks" tab
- You should see your test event!
The event will show:
- Source: The vendor name (e.g.,
stripe) - Payload: Preview of the webhook data
- Timestamp: When it was received
- Status:
delivered(if successful)
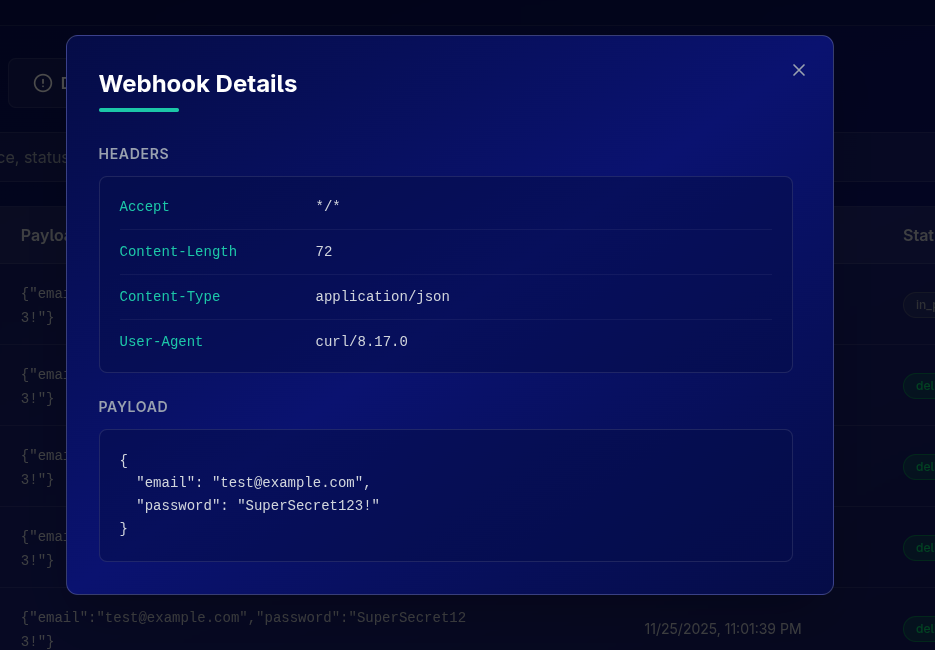
Click to View Details
Click on any event row to see the full details:
- Complete payload (JSON)
- All headers received
- Response from your application
Step 4: Verify It Reached Your Application
Now check that the webhook was forwarded to your destination URL:
If using webhook.site or RequestBin
- Refresh the page
- You should see the webhook appear with Relae's forwarded headers
If using your own endpoint
- Check your application logs
- Look for a POST request to your webhook endpoint
- Verify the payload matches what you see in Relae
What Gets Forwarded?
Relae forwards the webhook with these headers:
{
  "headers": {
    "Content-Type": "application/json",
    "User-Agent": "Relae-Webhook-Forwarder/1.0",
    "X-Relae-Event-ID": "evt_abc123...",
    "X-Relae-Source": "stripe",
    "X-Relae-Timestamp": "1701234567",
    "X-Relae-Signature": "t=1701234567,v1=abc123..."
    // ... plus any custom headers you configured
  },
  "body": {
    // Original webhook payload from vendor
  }
}
Header Descriptions
| Header | Description | Example |
|---|---|---|
Content-Type | Always application/json | application/json |
User-Agent | Identifies Relae as the forwarder | Relae-Webhook-Forwarder/1.0 |
X-Relae-Event-ID | Unique ID for this webhook event | evt_abc123... |
X-Relae-Source | The vendor that sent the webhook | stripe, shopify, github |
X-Relae-Timestamp | Unix timestamp when forwarded | 1701234567 |
X-Relae-Signature | HMAC signature for verification | t=1701234567,v1=abc123... |
Plus any custom headers you configured for this destination.
Step 5: Verify the HMAC Signature (Recommended)
For security, you should verify that the webhook actually came from Relae and wasn't tampered with.
Understanding the Signature
Every forwarded webhook includes:
X-Relae-Signature: Signature in formatt=timestamp,v1=signature- The timestamp and HMAC-SHA256 signature combined
Get Your Webhook Secret
- Go to your Relae dashboard
- Click Account → Webhooks tab
- Copy your Relae Webhook Secret (starts with
whsec_) - Store it securely in your environment variables
Verification Process
- Extract the signature and timestamp from the
X-Relae-Signatureheader - Compute HMAC-SHA256 of:
{timestamp}.{raw_body} - Compare with the signature from the header
Code Examples
Node.js / Express
Relae Node SDK
Relae offers a comprehensive Node SDK that includes signature verification.
Utils.verifyRelaeSignature(body, signature, secret)
Verify the authenticity of an incoming Relae webhook using HMAC signature verification.
import { Utils } from "relae";

const isValid = Utils.verifyRelaeSignature(
  body: string,      // Raw request body as string
  signature: string, // X-Relae-Signature header value
  secret: string     // Your webhook secret
  toleranceSec?: number // Optional: max age in seconds (default 300)
): boolean;
Example with Express:
import express from "express";
import { Utils } from "relae";

const app = express();

app.post(
  "/webhooks/relae",
  express.raw({ type: "application/json" }),
  (req, res) => {
    const signature = req.headers["x-relae-signature"] as string;
    const secret = process.env.RELAE_WEBHOOK_SECRET!;
    const body = req.body.toString();

    if (!Utils.verifyRelaeSignature(body, signature, secret)) {
      return res.status(401).send("Invalid signature");
    }

    const payload = JSON.parse(body);
    console.log("Valid webhook received:", payload);

    res.status(200).send("OK");
  },
);
Python / Flask
import hmac
import hashlib

def verify_relae_webhook(payload: str, signature: str, secret: str) -> bool:
    """Verify webhook signature from Relae"""
    # Parse signature: t=timestamp,v1=signature
    sig_parts = dict(item.split('=') for item in signature.split(','))
    timestamp = sig_parts.get('t')
    received_sig = sig_parts.get('v1')

    if not timestamp or not received_sig:
        return False

    # Create signed payload
    signed_payload = f"{timestamp}.{payload}"

    # Compute HMAC
    expected_sig = hmac.new(
        secret.encode('utf-8'),
        signed_payload.encode('utf-8'),
        hashlib.sha256
    ).hexdigest()

    # Constant-time comparison
    return hmac.compare_digest(expected_sig, received_sig)

# Usage in Flask
from flask import Flask, request, jsonify

app = Flask(__name__)

@app.route('/webhook', methods=['POST'])
def webhook():
    signature = request.headers.get('X-Relae-Signature')
    payload = request.get_data(as_text=True)
    secret = os.environ['RELAE_WEBHOOK_SECRET']

    if not verify_relae_webhook(payload, signature, secret):
        return jsonify({'error': 'Invalid signature'}), 401

    # Process webhook
    event = request.get_json()
    print(f"Verified webhook: {event}")

    return jsonify({'received': True})
Go
package main

import (
    "crypto/hmac"
    "crypto/sha256"
    "encoding/hex"
    "fmt"
    "io"
    "net/http"
    "os"
    "strings"
)

func verifyRelaeWebhook(payload, signature, secret string) bool {
    // Parse signature: t=timestamp,v1=signature
    parts := strings.Split(signature, ",")
    var timestamp, sig string

    for _, part := range parts {
        kv := strings.SplitN(part, "=", 2)
        if len(kv) != 2 {
            continue
        }
        switch kv[0] {
        case "t":
            timestamp = kv[1]
        case "v1":
            sig = kv[1]
        }
    }

    if timestamp == "" || sig == "" {
        return false
    }

    // Create signed payload
    signedPayload := fmt.Sprintf("%s.%s", timestamp, payload)

    // Compute HMAC
    mac := hmac.New(sha256.New, []byte(secret))
    mac.Write([]byte(signedPayload))
    expectedSig := hex.EncodeToString(mac.Sum(nil))

    // Constant-time comparison
    return hmac.Equal([]byte(sig), []byte(expectedSig))
}

// Usage in HTTP handler
func webhookHandler(w http.ResponseWriter, r *http.Request) {
    signature := r.Header.Get("X-Relae-Signature")

    payload, err := io.ReadAll(r.Body)
    if err != nil {
        http.Error(w, "Failed to read body", 400)
        return
    }

    secret := os.Getenv("RELAE_WEBHOOK_SECRET")

    if !verifyRelaeWebhook(string(payload), signature, secret) {
        http.Error(w, "Invalid signature", 401)
        return
    }

    // Process webhook
    var event map[string]interface{}
    json.Unmarshal(payload, &event)
    fmt.Printf("Verified webhook: %v\n", event)

    w.WriteHeader(200)
    json.NewEncoder(w).Encode(map[string]bool{"received": true})
}
Ruby / Sinatra
require 'openssl'

def verify_relae_webhook(payload, signature, secret)
  # Parse signature: t=timestamp,v1=signature
  sig_parts = signature.split(',').map { |part| part.split('=') }.to_h
  timestamp = sig_parts['t']
  received_sig = sig_parts['v1']

  return false if timestamp.nil? || received_sig.nil?

  # Create signed payload
  signed_payload = "#{timestamp}.#{payload}"

  # Compute HMAC
  expected_sig = OpenSSL::HMAC.hexdigest(
    OpenSSL::Digest.new('sha256'),
    secret,
    signed_payload
  )

  # Constant-time comparison
  Rack::Utils.secure_compare(expected_sig, received_sig)
end

# Usage in Sinatra
post '/webhook' do
  request.body.rewind
  payload = request.body.read
  signature = request.env['HTTP_X_RELAE_SIGNATURE']
  secret = ENV['RELAE_WEBHOOK_SECRET']

  unless verify_relae_webhook(payload, signature, secret)
    halt 401, { error: 'Invalid signature' }.to_json
  end

  # Process webhook
  event = JSON.parse(payload)
  puts "Verified webhook: #{event}"

  { received: true }.to_json
end
PHP
<?php
function verifyRelaeWebhook($payload, $signature, $secret) {
    // Parse signature: t=timestamp,v1=signature
    $parts = explode(',', $signature);
    $timestamp = null;
    $sig = null;

    foreach ($parts as $part) {
        list($key, $value) = explode('=', $part, 2);
        if ($key === 't') {
            $timestamp = $value;
        } elseif ($key === 'v1') {
            $sig = $value;
        }
    }

    if (!$timestamp || !$sig) {
        return false;
    }

    // Create signed payload
    $signedPayload = $timestamp . '.' . $payload;

    // Compute HMAC
    $expectedSig = hash_hmac('sha256', $signedPayload, $secret);

    // Constant-time comparison
    return hash_equals($expectedSig, $sig);
}

// Usage
$payload = file_get_contents('php://input');
$signature = $_SERVER['HTTP_X_RELAE_SIGNATURE'] ?? '';
$secret = getenv('RELAE_WEBHOOK_SECRET');

if (!verifyRelaeWebhook($payload, $signature, $secret)) {
    http_response_code(401);
    echo json_encode(['error' => 'Invalid signature']);
    exit;
}

// Process webhook
$event = json_decode($payload, true);
error_log('Verified webhook: ' . print_r($event, true));

http_response_code(200);
echo json_encode(['received' => true]);
?>
Include a tolerance check to prevent replay attacks:
const TOLERANCE_SECONDS = 300; // 5 minutes
const now = Math.floor(Date.now() / 1000);

if (Math.abs(now - parseInt(timestamp)) > TOLERANCE_SECONDS) {
  return res.status(401).send("Timestamp too old");
}
Get your Relae webhook secret from:
- Dashboard → Account → Webhooks tab
- Look for "Relae Webhook Secret"
- Copy the value (starts with
whsec_) - Store in environment variable:
RELAE_WEBHOOK_SECRET
Step 6: Test Failure Scenarios
Let's test what happens when your application is down or returns an error:
Simulate a Failure
- Temporarily shut down your application (or change the destination URL to something invalid)
- Trigger another test webhook from your vendor
- Watch what happens in Relae
What You'll See
- Webhooks tab: Event appears with status
pendingorfailed - Automatic retries: Relae retries up to 5 times with exponential backoff
- 1st retry: Immediate
- 2nd retry: After 5 seconds
- 3rd retry: After 25 seconds
- 4th retry: After 125 seconds
- 5th retry: After 625 seconds
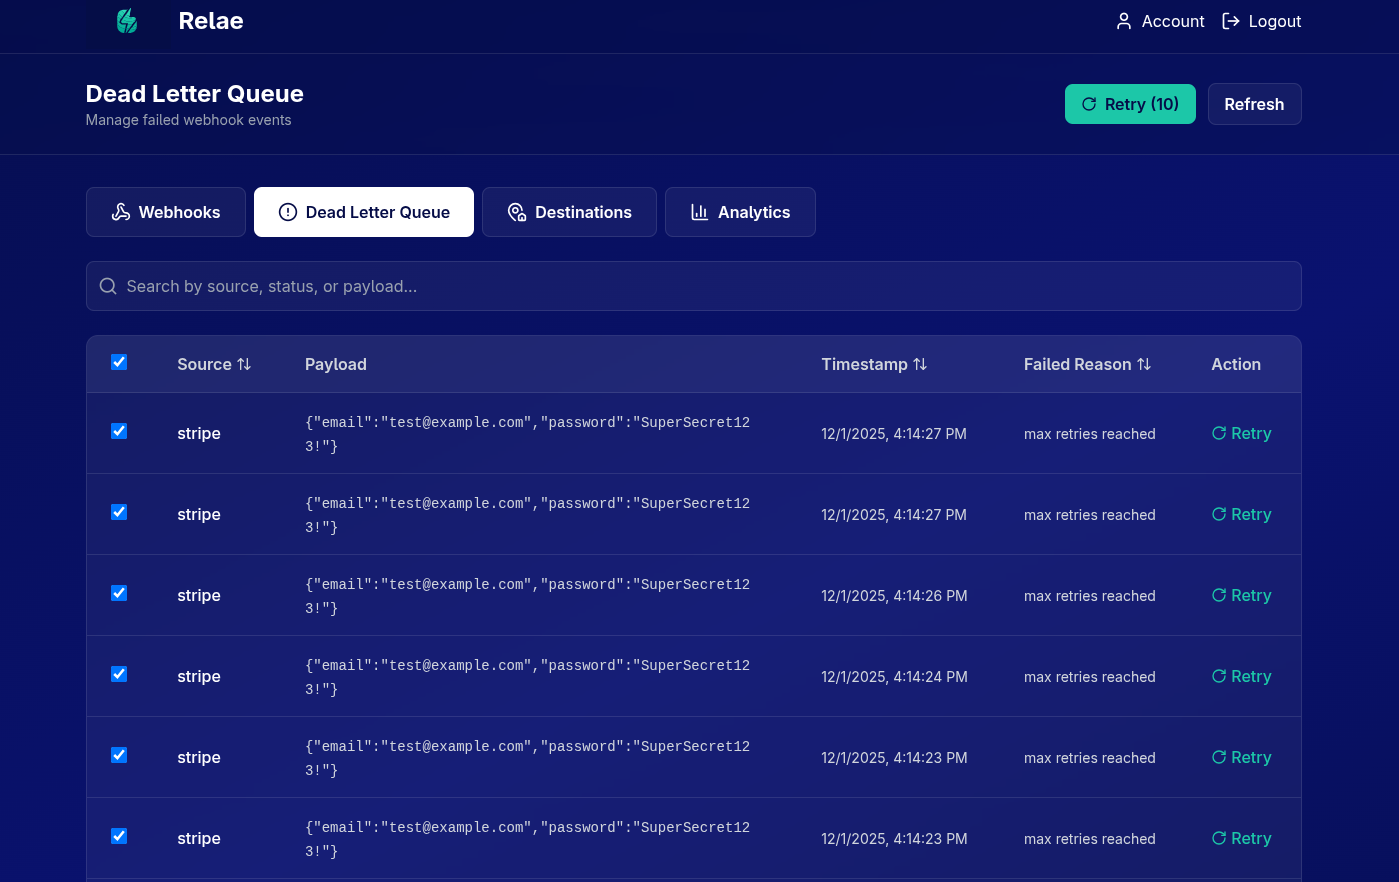
- Dead Letter Queue: After 5 failures, event moves to the DLQ tab
Manual Retry from DLQ
- Go to the "Dead Letter Queue" tab
- Find your failed event
- Click "Retry" button
- Event is reprocessed and forwarded again
Success! 🎉
Congratulations! You've successfully:
- ✅ Created a Relae account
- ✅ Configured a destination
- ✅ Set up your vendor to send webhooks to Relae
- ✅ Received and forwarded your first webhook
- ✅ Verified the HMAC signature
- ✅ Tested the failure/retry mechanism
Need Help?
If something isn't working:
- Check the Troubleshooting section below
- Review the Verifying Signatures Guide
- Email us at support@relaehook.com
Troubleshooting
Event not showing in Relae dashboard
Possible causes:
- Vendor sent webhook to wrong URL
- Webhook signature verification failed (invalid secret)
- Vendor didn't trigger the webhook
Solutions:
- Double-check the endpoint URL in vendor settings
- Verify the webhook secret is correct in both places
- Check vendor's webhook logs for delivery attempts
- Try sending a test webhook from vendor dashboard
Event in Relae but not reaching my application
Possible causes:
- Incorrect destination URL
- Your application is down or returning errors
- Firewall blocking Relae's IP addresses
Solutions:
-
Verify destination URL is correct and accessible
-
Check your application logs for errors
-
Test destination URL with curl:
curl -X POST https://your-destination-url.com/webhook \
  -H "Content-Type: application/json" \
-d '{"test": true}' -
Whitelist Relae's IP ranges (contact support for list)
Signature verification failing
Possible causes:
- Using wrong endpoint token
- Body being modified before verification
- Timestamp tolerance too strict
Solutions:
- Copy endpoint token from Relae destination settings
- Verify raw body before any parsing or modifications
- Add timestamp tolerance (5-10 minutes)
- Check that signature format is
sha256={hash} - Enable debug logging to see computed vs. expected signatures
Events going to DLQ immediately
Possible causes:
- Destination URL returning 4xx/5xx errors
- Destination URL unreachable
- SSL/TLS certificate issues
Solutions:
- Check destination URL returns 2xx status codes
- Verify SSL certificate is valid
- Test with curl to see exact error
- Check application logs for errors
- Try a test destination URL (webhook.site) first